As the semester comes to an end I have finally been able to start making more time to crochet! As this semester (and year!) comes to a close I will finally be able to start blogging and sharing my patterns again! I have so much I want to do, but I am going to start slowly. I can't wait to make this a fun active blog again! And tell you about some of the fun projects I have made!
Happy hooking!
See you soon!
Friday, December 11, 2015

Friday, June 5, 2015
Welcome to 2015
Hello everyone! It has been a LONG while. I know I said I was back about a year ago, but, as it is with life, things happened. However, it is now my first summer after being in college and I have rediscovered my passion for crochet. I have changed my major in college and I lost my car in a very scary car accident. Though I have been through some tough times lately, and I am continuing to go through them, I have realized how important and influential crochet has been in my life over the years. With this realization, I have also realized how much I have missed this blog and creating new crochet patterns. Although I have faltered in the past, I am ready to bring this blog back to life. I have several new patterns I am excited to share and post here and on Ravelry. I will be deleting some of my old posts and updating the format of this blog. Additionally, I will soon be making a Tumblr and a Twitter in combination to this blog. I am recommitting myself to the beauty, complexity, and comfort of crochet and the enjoyment I find in being creative and designing new patterns. I hope my rediscovered passion for this craft is visible and can be shared once again. Expect for regular updates on pattern progress and project updates!
Happy crafting!
Happy crafting!
Wednesday, November 21, 2012
Both or Back Better Brushed?
Hello everyone!
Most of the time amigurimi is made by crocheting through both loops. Lately however, it seems to me that there are more and more people who are making amigurumi, that only crochet through the back loop. Which way is better is not the topic of this post. I have made amigurumi crocheting through both loops and using the back loop only method. When I was thinking about the differences between the two methods, I started wondering: "Which way is the best to brush?"
If you aren't familiar with brushing your crochet I will explain it quickly for you. Once you are finished crocheting your project, you take a pet brush like the one in the photo below and you brush your project until it is fuzzy.

I wanted to make a little experiment to find out if something crocheted through both loops or through the back loop only would get fuzziest/fluffiest when brushed.
I made two circles. I used the same hook size, the same yarn, and I made both circles the same size. The only difference between the two circles was one was crocheted through both loops and one was crocheted through the back loop only.


After taking pictures of the circles, I began brushing them. I noticed that the circle that was crocheted through the back loop only seemed to get fuzzy quicker than the other circle. I brushed each circle until it was really fuzzy. Here are the results:


I did not notice a large difference between the two circles on how fuzzy they were. I think they ended up being about equally fuzzy. The back loop only circle took less time to become fuzzy than the both loop circle. If I were making a larger project that I was planning on brushing, I would use the back loop only method if possible.
Which do you think looks fuzziest?
This was a really fun experiment!
Happy crocheting everyone!
Most of the time amigurimi is made by crocheting through both loops. Lately however, it seems to me that there are more and more people who are making amigurumi, that only crochet through the back loop. Which way is better is not the topic of this post. I have made amigurumi crocheting through both loops and using the back loop only method. When I was thinking about the differences between the two methods, I started wondering: "Which way is the best to brush?"
If you aren't familiar with brushing your crochet I will explain it quickly for you. Once you are finished crocheting your project, you take a pet brush like the one in the photo below and you brush your project until it is fuzzy.

Brush I used to brush my crochet circles
I wanted to make a little experiment to find out if something crocheted through both loops or through the back loop only would get fuzziest/fluffiest when brushed.
I made two circles. I used the same hook size, the same yarn, and I made both circles the same size. The only difference between the two circles was one was crocheted through both loops and one was crocheted through the back loop only.

Before being brushed

Before being brushed

Here you can see the two circles next to each other before they were brushed.
After taking pictures of the circles, I began brushing them. I noticed that the circle that was crocheted through the back loop only seemed to get fuzzy quicker than the other circle. I brushed each circle until it was really fuzzy. Here are the results:

After being brushed

After being brushed

Here you can see the two circles next to each other after being brushed.
I did not notice a large difference between the two circles on how fuzzy they were. I think they ended up being about equally fuzzy. The back loop only circle took less time to become fuzzy than the both loop circle. If I were making a larger project that I was planning on brushing, I would use the back loop only method if possible.
Which do you think looks fuzziest?
This was a really fun experiment!
Happy crocheting everyone!
Monday, August 6, 2012
Elephant!
Let me get these links out of the way first.The links are to the pattern I used to make my Elephant (I find it easier to post links to patterns links in the beginning rather than posting them throughout my post) Link to the Padma pattern on Ravelry: Padma pattern page on Ravelry. Here is the link directly to the pattern: Direct link to Padma pattern

I wasn't planning on making any amigurumi for the Ravellenic Games, but that changed. One of the patterns for my Ravelry group, Awesome Amigurumi, August CAL was Padma designed by Dawn Toussaint. All I can say is, "Wow!" One of my least favorite things about amigurumi is sewing on or together the pieces. I didn't have to do any sewing with this pattern! No sewing! It is fantastic! The ears are crocheted on! It is difficult to explain, so I am not going to try to explain it, I would just suggest you try this pattern out (or at least take a peak at it).
I did have trouble with my stitch count (my stitch count was off for nearly the entire body) I know where I went wrong, but I didn't go back and fix it because I wasn't really worried about it. In the end it turned out okay :)
I haven't finished an amigurumi project in a while and I have really missed making them.

Here is my finished elephant
I decided to only do one hat for my Ravellenic Game projects. I don't think I will get too many more projects done for the games because school starts this Thursday for me (August 9th). I am going to try and start posting regularly. I am planning on trying to post once a week, but right now I am not sure what days. Hopefully, I will know a little bit more soon. I get the schedule of my classes tomorrow (August 7th)
Have a great day everyone!!
Friday, July 27, 2012
Olympic and Ravellenic Games
As you may or may not know the Olympic Games start today and that also means that the Ravellenic Games start today as well. I have several projects planned for the Ravellenic Games. I have several crochet projects as well as knit projects planned. When choosing my projects I tried to choose projects that I could get done in a relatively short amount of time. I wanted to challenge myself with how many project I could get done but not over extend myself.

I have three crochet projects planned and three knitting projects planned.
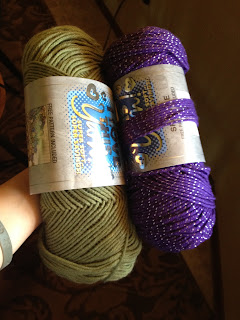
Two of the three crochet projects are baby hats. I am using a different pattern for each hat. The pattern that I am using for the first hat is Lickety Split Crocheted Newborn Hats The pattern I am using for the other hat is Crochet Baby Beanie. I am planning on donating these hats to a charity so I am using acrylic yarn to make them. I am planning on using the purple yarn with the silver strand in it for the first hat and the sage green color yarn for the second hat.


Ravellenic Games Flag Logo Thingy
I have three crochet projects planned and three knitting projects planned.
Two of the three crochet projects are baby hats. I am using a different pattern for each hat. The pattern that I am using for the first hat is Lickety Split Crocheted Newborn Hats The pattern I am using for the other hat is Crochet Baby Beanie. I am planning on donating these hats to a charity so I am using acrylic yarn to make them. I am planning on using the purple yarn with the silver strand in it for the first hat and the sage green color yarn for the second hat.

My other crochet project is Round Bumpy Scrubbie. I am making this out of some cream colored cotton yarn.

For my knitting projects, I chose projects that would help me get better at knitting and learn more knitting skills.
My first knitting project I have planned to make is the Waffle Knit Dishcloth. I have not knit very many different stitch combinations so this will be an adventure to try. I chose this pattern because it isn't like anything I have knit before (which isn't really saying much haha) I am planning on making this in purple cotton. I will most likely not use it as a dishcloth but I will probably use it as a blanket square.

My second knitting project is one that I have made before it is Monster Chunks. The first time I made a Monster Chunk the stitches weren't very tight and I had to put lining in it so the stuffing wouldn't show through. I chose this project because I want to improve my knitting in the round. I am using a multicolored blue yarn for the body (I think, I might change my mind) and a light dusty blue color for the feet.

Body Color (Maybe)

Feet Color (It is kind of hard to see but it is a gray blue color)
My last knitting project that I have planned is Grandmother's Favorite Dishcloth. I have made this pattern before, but I did not do the increases and decreases that are suggested in the pattern. This time I am planning on doing the increases and decreases that are suggested in the pattern. I chose this pattern to learn and practice a different way to increase and decrease. I am not sure what yarn I am going to use for this project yet. Perhaps I will use scrap yarn.
I know this post had a lot about knitting in it that is why I am planning on starting a blog just about my knitting adventures.
I will post updates on the progress of all my Ravellenic projects both knitting and crochet throughout the games. I am really excited for the Olympics and Ravellenic Games to start!! :D :D
I hope you all have great days today!!
A question for the comments: Are you excited for the Olympics to start?
Monday, July 23, 2012
Quick Crochet Hook Holder Free Pattern
Quick Crochet Hook Holder

Materials
5.5mm Crochet Hook
Worsted Weight Yarn
Stitches Used
ch- chain
dc- double crochet
sc- single crochet
sl st- slip stitch
Note: The starting chain length determines the length of the hook holder. To make a hook holder for more hooks, use a longer starting chain.
Pattern
Ch 28
R1: Dc in 4th ch from hook, dc across (25)
R2: Turn work, ch 3 (count as first dc now and throughout) dc across (25)
R3-5: Repeat Row 2
R6: Turn work, ch1, sc across
Finish off, Weave in ends
Optional Strap
Sl st on the end of the middle row, ch 30, sl st into each ch space
Sl st into base, ch 30, sl st into each ch space
Finish Off
Insert crochet hooks into the holder by weaving them in and out of the rows of double crochet.

Roll up the holder and tie with the straps or a piece of scrap yarn loosely around the holder to keep it from coming unrolled (optional)
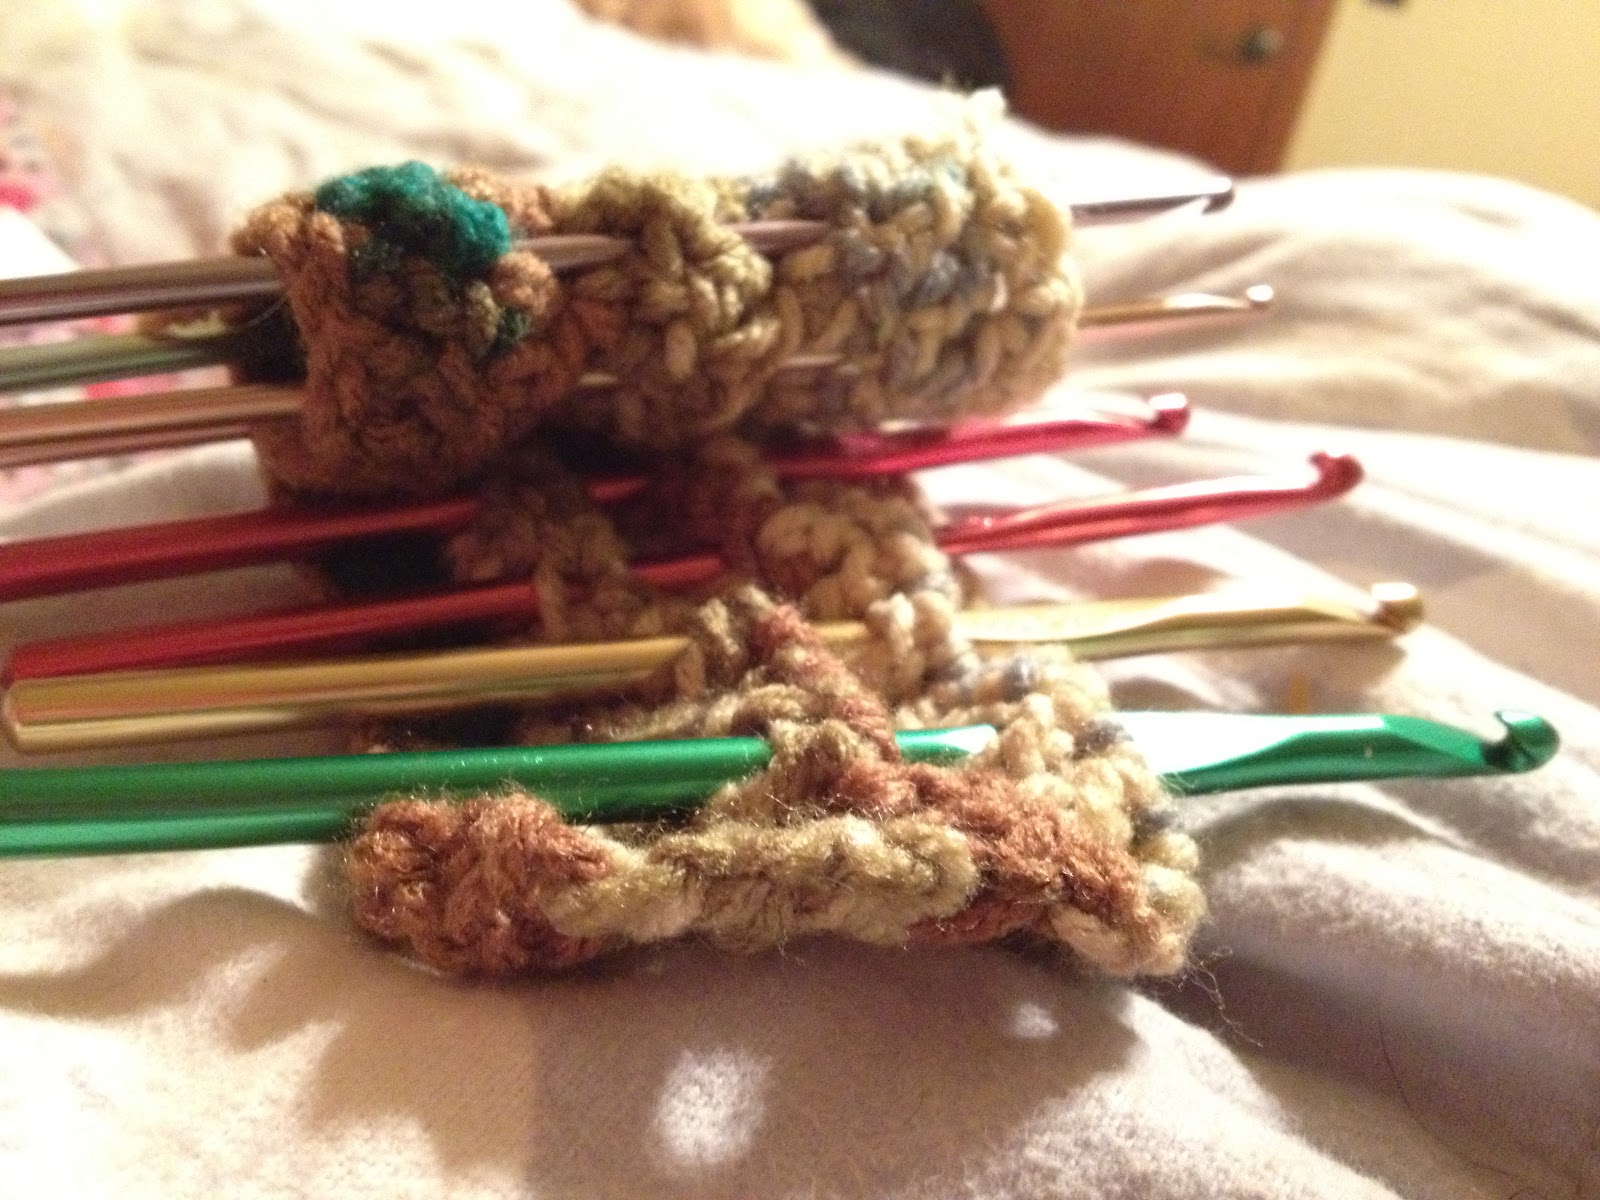
You can also single crochet around the outside edge of the holder to give it a more completed look if you would like. :)
Please leave a comment telling me what you think of the pattern! :)
Have a great day!!
Coming Soon: Quick Crochet Hook Holder
I have another free pattern for you all! It is a crochet hook holder. I had made a little pouch for my crochet hooks, but after reading some information I found out that it is not good for your crochet hooks to hit against each other. That is what mine were doing in the pouch I made so I came up with a solution!
You simply weave your crochet hooks between the rows!
I did not make mine with a strap but there is an option for a strap in the pattern. It is a very very easy pattern. The pattern is worked in rows. I wanted this pattern to be easily adaptable and very customizable. I will try to put the pattern up today or tomorrow. :)
Have a great day everyone!!
Thursday, July 12, 2012
Finished Hat and Mozart
First topic: I finished my hat! (Yay!)
I finished my hat! I really like the pattern. It is a very simple hat and the pattern is very simple as well. I finished my hat in a few hours. It just took me a while to post an update. Here is my hat! Tada!!

I had run out of the tan color but I thought it needed one more row. I used dark brown yarn for the last row. I am really happy I did the last row in dark brown because I think it gives the hat a nice look. I showed a picture of it to my sister and now she wants one. Since she asked for professional colors, I will either make her a gray hat with the last row black or a light gray hat with the last row dark gray.
Here is the link to the pattern if you would like to make your own hat :)
Now, onto the second topic: Mozart
I stumbled upon a blog and one of the blog posts was about taking care of your dogs on July 4th. (Here is the link to the post: Take Care of Your Doggies This Fourth!!!) I really wish I saw this before the Fourth because I have dogs and they did not have fun! They stayed inside, but they were still scared of all the loud noise from the fireworks. One of the suggestions was to play some calm music for your dogs. That reminded me of something that I had heard before (I am not sure where I heard it). It reminded me that classical music calms dogs. One of the more calming classical composers I know of is Mozart. I looked up what Mozart songs are calming for dogs, then I looked those songs up on YouTube. I started playing the music and all my dogs fell asleep. I will definitely start playing classical music for my dogs more often!!
Question: Do you like classical music? Please feel free to leave an answer in the comments :)
Have a great day everyone!!
Friday, July 6, 2012
Making a Hat
I am making a hat.
I have been crocheting for a while now and I have not completed an item that can be worn yet. I am not talking about a sweater or a shawl. I am just talking about a hat or a scarf. I have started a scarf for my mom, but I have not completed it yet. I would like to make myself something as well. That is why I am making a hat.
I have not made a hat before so I want to start of with a simple and basic hat pattern. Nothing fancy, I just want to make a basic hat. Luckily, I found exactly what I was looking for!! I am making Basic Hat Pattern Version 1 by Sherry Etheridge. I found it on Ravelry but the pattern is actually on her blog. Here is the link to the pattern on her blog, Basic Hat Pattern Version 1 by Sherry Etheridge
I am off to start on it now! Hopefully I can finish it in one day!!
I will update you all when I have finished it :)
I have been crocheting for a while now and I have not completed an item that can be worn yet. I am not talking about a sweater or a shawl. I am just talking about a hat or a scarf. I have started a scarf for my mom, but I have not completed it yet. I would like to make myself something as well. That is why I am making a hat.
I have not made a hat before so I want to start of with a simple and basic hat pattern. Nothing fancy, I just want to make a basic hat. Luckily, I found exactly what I was looking for!! I am making Basic Hat Pattern Version 1 by Sherry Etheridge. I found it on Ravelry but the pattern is actually on her blog. Here is the link to the pattern on her blog, Basic Hat Pattern Version 1 by Sherry Etheridge
I am off to start on it now! Hopefully I can finish it in one day!!
I will update you all when I have finished it :)
Monday, July 2, 2012
Multicolored Owl Free Pattern
The Multicolored Owl pattern is now available! Multicolored Owl is also available as a PDF! Here is the download link: Multicolored Owl Download Link

 Body and Head
R3: sc 2, 2sc in next st (24)
Multicolored Owl

Materials
Three different colors of Worsted weight Yarn
WhiteWorsted Weight Yarn
12mm Safety Eyes
5.5mm Hook
3.75mm Hook
Yarn Needle
Stitch Marker
Stuffing
Felt or small amount of different colored yarn for beak
**Multicolored Owl is worked from the bottomup**
Colors
|
Colors I Used
|
Color A
u Color A will be used in both the bottom and top part of the owl.
|
Tan
|
Color B
|
Brown
|
Color C
|
Ivory
|
 Body and Head
Using 5.5mm hook and Colors A and B
Placea knot towards the ends of the colors A and B (As seen in photo to the right)
Make a magic ring, 6 sc in ring (6)
R1: 2sc in each st around (12)
R2: 1sc, 2sc in next st(18)
R3: sc 2, 2sc in next st (24)
R4: sc 3, 2sc in next st (30)
R5-8: Sc around (30)
Change to Colors A and C
R9-13: Sc around (30)
R14: sc 7, 2hdc in next st, sc 14, 2hdc in next st, sc 7 (32)
Tie off
Leave a long strand for sewing
Eye Circles (Make 2) Using 3.75mm hook and White yarn (single strand)
Make magic ring, sc 6 in loop
R1: 2sc in each st around (12)
R2: 1sc, 2sc in next st (18)
R3: 1sc in next st, make sl st in next st and use to tie off
R1: 2sc in each st around (12)
R2: 1sc, 2sc in next st (18)
R3: 1sc in next st, make sl st in next st and use to tie off
Assembly
Attach the safety eyes to the white eye circles you made.
Weave in the ends. Sew eyes onto the owl.
Attach the beak.
Stuff the owl. Fold the opening to where the stitches are aligned across. Sew together.
More photos for reference are available on the PDF version of this pattern
©Carissa Teixeira
Donot sell this pattern
Donot distribute this pattern as your own
Friday, June 29, 2012
Coming Soon: Another Pattern
Hello everyone!!
Yes, it is true. I am working on another amigurumi pattern! I didn't plan on making a pattern when I started making it. One thing led to another though and I decided to make a pattern for it. This is actually not like my other amigurumi patterns though. It is based of an actually animal. "Whooo?" you ask? Well, it asks "Whooo?" too!
I introduce to you Mister Multicolored Owl!
Yes, it is true. I am working on another amigurumi pattern! I didn't plan on making a pattern when I started making it. One thing led to another though and I decided to make a pattern for it. This is actually not like my other amigurumi patterns though. It is based of an actually animal. "Whooo?" you ask? Well, it asks "Whooo?" too!
I introduce to you Mister Multicolored Owl!
You will be able to make your own Mister or Misses Multicolored Owl very soon!! They are very quick projects.
I am still in the process of writing the pattern. I am not sure the exact date it will be released, but be sure to keep an eye open for the pattern!
Please let me know what you think of Multicolored Owl in the comments :)
Wednesday, June 27, 2012
I Need to Get Motivated!
I need to get motivated. I have several projects in progress right now that I would really like to finish. I also have several projects I need to start on. I need to start on a toy that my sister wants to give to her friend's daughter. I have been putting off making one for a few weeks now. I am starting on it tomorrow or perhaps later today.
Today I have several works in progress (WIPs) that I would like to work on. I have a simple scarf I have been working on for a while now. I have a giant granny square blanket that need completing. I also have a blanket square that is halfway done. I am going to work on the blanket square first. It is the smallest of the three projects and it is will be the quickest to complete. I am planning on making a few squares from the same pattern as the one I am currently working on. Here is the link to the blanket square pattern: Drop in the Bucket 12" Square
None of these WIPs have to be done anytime soon. I would just like them to be. :)
Please feel free to leave a comment telling me about your current WIPs :)
Today I have several works in progress (WIPs) that I would like to work on. I have a simple scarf I have been working on for a while now. I have a giant granny square blanket that need completing. I also have a blanket square that is halfway done. I am going to work on the blanket square first. It is the smallest of the three projects and it is will be the quickest to complete. I am planning on making a few squares from the same pattern as the one I am currently working on. Here is the link to the blanket square pattern: Drop in the Bucket 12" Square
None of these WIPs have to be done anytime soon. I would just like them to be. :)
Please feel free to leave a comment telling me about your current WIPs :)
Tuesday, June 26, 2012
Awesome Amigurumi Friend Free Pattern
Awesome Amigurumi Friend

Materials
4.0mm HookYarn Needle
Worsted Weight Yarn
Stitch Marker
Stuffing
10mm Safety Eyes (optional)
A small amount of a different colored yarn to make the mouth (optional)
Head and Body
Make Magic Ring, Sc 6 (6)R1: 2 sc in each st around (12)
R2: Sc 1, 2 sc in next st (18)
R3: Sc 2, 2 sc in next st (24)
R4: Sc 3, 2 sc in next st (30)
R5: Sc 4, 2 sc in next st (36)
R6‐9: Sc in each st around (36)
R10: Sc 4, sc2tog (30)
R11: Sc 3, sc2tog (24)
Place Safety Eyes and sew on mouth
R12: Sc 2, sc2tog (18)
Begin stuffing
R13: Sc 1, sc2tog (12)
R14‐15: Sc in each st around (12)
R16: Sc 1, 2 sc in next st (18)
R17: Sc 2, 2 sc in next st (24)
R18‐19: Sc in each st around (24)
Continue stuffing firmly
R20: Sc 3, 2 sc in next st (30)
R21‐34: Sc in each st around (30)
Continue stuffing firmly
R35: Sc 3, sc2tog (24)
R36: Sc 2, sc2tog (18)
R37: Sc 1, sc2tog (12)
R38: sc2tog around (6)
Finish Off
Arms (Make 2)
Magic Ring, Sc 4
R1: 2 sc in each st around (8)
R2‐12: Sc in each st around (8)
Stuff lightly
Finish Off, Leave long tail for sewing
Legs (Make 2)
Magic Ring, Sc 5
R1: 2 sc in each st around (10)
R2‐15: Sc in each st around (10)
Stuff
Finish Off, Leave long tail for sewing
Sew arms and legs onto body
Arm
and Leg Suggested Placement
This is where I put the arms and legs. Feel free to attach them
where ever you prefer.I placed the arms on the sides of the body around Row 18.
I placed the legs on the bottom of the body.
© Carissa Teixeira
Do not sell this pattern
Do not distribute this pattern
as your own
New Pattern Release
Hello everyone!
I wanted to make a quick blog post to announce that I am realeasing a new pattern. It is going to be a free pattern. It is for an amigurumi. I designed it to celebrate having 50 members in my Ravelry group Awesome Amigurumi. Here is a link to the group if you would like to take a look at it: Link to Awesome Amigurumi group on Ravelry
I would also like to share that I will be updating this blog more often. I will be sharing with you my crochet projects I am working on and updating you on there progress. I will also be sharing some tips that I have learned so that maybe they can help you as well!
Thank you!
I wanted to make a quick blog post to announce that I am realeasing a new pattern. It is going to be a free pattern. It is for an amigurumi. I designed it to celebrate having 50 members in my Ravelry group Awesome Amigurumi. Here is a link to the group if you would like to take a look at it: Link to Awesome Amigurumi group on Ravelry
I would also like to share that I will be updating this blog more often. I will be sharing with you my crochet projects I am working on and updating you on there progress. I will also be sharing some tips that I have learned so that maybe they can help you as well!
Thank you!
Monday, June 18, 2012
Free Purple Monster Pattern
Purple
Monster Pattern

Purple Monster
Pattern
Materials
Hook: 4mm
Purple Worsted Weight Yarn (or any color for a different
colored monster)
A small amount of a different colored yarn for the mouth
(optional)
12mm Safety Eyes (optional) (Safety eyes are not safe for small
children)
Stitch Marker
Yarn needle
You need to know how
to make a magic ring for this pattern.
Body
**Make a magic ring, sc 5 in the ring (5)**
R1: 2sc in each st around (10)
R2: Sc1, 2Sc in next st; Rep 5 times (15)
R3: Sc 2, 2Sc in next st; Rep 5 times (20)
R4: Sc 3, 2Sc in next st; Rep 5 times (25)
R5: Sc 4, 2Sc in next st; Rep 5 times (30)
R6: Sc 5, 2Sc in next st; Rep 5 times (35)
R7: Sc 6, 2Sc in next st; Rep 5 times (40)
R8: Sc 7, 2Sc in next st; Rep 5 times (45)
R9: Sc 8, 2Sc in next st; Rep 5 times (50)
R10-17: Sc in each st around (50)
R18: Sc 8, sc2tog; Rep 5 times (45)
R19: Sc in each st around (45)
R20: Sc 7, sc2tog; Rep 5 times (40)
R21: Sc 6, sc2tog; Rep 5 times (35)
R22-24: Sc in each st around (35)
R25: Sc 6, 2Sc in next st; Rep 5 times (40)
R26: Sc 7, 2Sc in next st; Rep 5 times (45)
R27-29: Sc in each st around (45)
R30:Sc 7, sc2tog; Rep 5 times (40)
R31:Sc 6, sc2tog; Rep 5 times (35)
R32:Sc 5, sc2tog; Rep 5 times (30)
Begin stuffing firmly
R33:Sc 4, sc2tog; Rep 5 times (25)
R34:Sc 3, sc2tog; Rep 5 times (20)
R35:Sc 2, sc2tog; Rep 5 times (15)
Continue stuffing
firmly
Tie off, leave long end
for sewing
Head
**Make a magic ring, sc 5 in the ring (5)**
R1: 2sc in each st around (10)
R2: Sc1, 2Sc in next st; Rep 5 times (15)
R3: Sc 2, 2Sc in next st; Rep 5 times (20)
R4: Sc 3, 2Sc in next st; Rep 5 times (25)
R5: Sc 4, 2Sc in next st; Rep 5 times (30)
R6: Sc 5, 2Sc in next st; Rep 5 times (35)
R7: Sc 6, 2Sc in next st; Rep 5 times (40)
R8: Sc 7, 2Sc in next st; Rep 5 times (45)
R9: Sc 8, 2Sc in next st; Rep 5 times (50)
R10-13: Sc in each st around (50)
R14: Sc 8, sc2tog; Rep 5 times (45)
R15:Sc 7, sc2tog; Rep 5 times (40)
R16:Sc 6, sc2tog; Rep 5 times (35)
R17:Sc 5, sc2tog; Rep 5 times (30)
Place Safety eyes and
begin stuffing firmly
R18:Sc 4, sc2tog; Rep 5 times (25)
R19:Sc 3, sc2tog; Rep 5 times (20)
R20:Sc 2, sc2tog; Rep 5 times (15)
Continue stuffing
firmly
Tie off
Arms (Make 2 or more)
**Make a magic ring, sc 5 in the ring (5)**
R1: 2sc in each st around (10)
R2-23: Sc in each st around (10)
Stuff lightly
Tie off, leave long
end for sewing
Sew the head and body together. Sew the arms on the body.
Sew a mouth (optional)
Thursday, June 7, 2012
Project Projects and more Projects!!
I have so many projects going right now! Okay, only about five but to me that is a lot!! I am going to try to get some done today! Hopefully I will succeed!
A side note, I have a new pattern that I am about to release for my Purple Monster. I can't wait!
A side note, I have a new pattern that I am about to release for my Purple Monster. I can't wait!
Saturday, June 2, 2012
Hobby Lobby Here I Come!!
I am going to Hobby Lobby today to get some much needed pink yarn. I am also getting some knitting needles! I can't wait to try knitting with actual needles. Up until now I have been using pencils. Haha Anyways, I will post an update after I get home from there.
Tuesday, May 29, 2012
Back again!
I am so sorry everyone! I have been really busy focusing on all my projects!! I have just designed an amigurumi. It is pretty simple in my opinion. I have written the pattern and typed it up. However, I can not release the pattern until I have it tested. If you are interested in testing please leave a comment. Here is a picture of my Purple Monster amigurumi

Saturday, May 12, 2012
Quick Update
Sorry I haven't been active lately! I have been really busy. I have been busy with crochet projects and my friends.
The main crochet project I am working on right now is a monkey. I will put the web address at the bottom. It is a fairly easy pattern. I am also making a simple scarf and a granny square blanket.
I really enjoy amigurumi but the one thing that bothers me is that some amigurumi projects require so much sewing (sewing the pieces together or on the body).
What is your favorite crochet project?
Monkey website address: http://www.ravelry.com/patterns/library/amigurumi-monkey-with-banana
The main crochet project I am working on right now is a monkey. I will put the web address at the bottom. It is a fairly easy pattern. I am also making a simple scarf and a granny square blanket.
I really enjoy amigurumi but the one thing that bothers me is that some amigurumi projects require so much sewing (sewing the pieces together or on the body).
What is your favorite crochet project?
Monkey website address: http://www.ravelry.com/patterns/library/amigurumi-monkey-with-banana
Thursday, May 3, 2012
Free Wallet/Card Holder Pattern
4.50mm Hook
Ch. 18
R1: sc17 - sc in 2nd loop from the hook
R2: *sc 17 under BOTH loops, ch1, turn
R3 - R29: Repeat from *
R30: sc2tog, sc 13, sc2tog (15), ch1, turn
R31: sc2tog, sc 11, sc2tog (13), ch1, turn
R32: even (13), ch1, turn
R33: even (13), ch1, turn
R34: sc2tog, sc 9, sc2tog (11), ch1, turn
R35: 2 sc2tog, sc 3, 2 sc2tog (7), ch1, turn
R36: 2 sc2tog, sc 1, 2 sc2tog (4), ch1, turn
R37: even (4), tie off, weave in ends
Fold Row 1 up to Row 27, sew sides together and stitch around top flap OR single crocheted sides together, and then continue up around the flap
sc2tog = sc decrease (single crochet two stitches together)
sc = single crochet

Ch. 18
R1: sc17 - sc in 2nd loop from the hook
R2: *sc 17 under BOTH loops, ch1, turn
R3 - R29: Repeat from *
R30: sc2tog, sc 13, sc2tog (15), ch1, turn
R31: sc2tog, sc 11, sc2tog (13), ch1, turn
R32: even (13), ch1, turn
R33: even (13), ch1, turn
R34: sc2tog, sc 9, sc2tog (11), ch1, turn
R35: 2 sc2tog, sc 3, 2 sc2tog (7), ch1, turn
R36: 2 sc2tog, sc 1, 2 sc2tog (4), ch1, turn
R37: even (4), tie off, weave in ends
Fold Row 1 up to Row 27, sew sides together and stitch around top flap OR single crocheted sides together, and then continue up around the flap
sc2tog = sc decrease (single crochet two stitches together)
sc = single crochet
Subscribe to:
Posts (Atom)