Translate this blog

Showing posts with label pattern. Show all posts

Monday, July 23, 2012

Quick Crochet Hook Holder Free Pattern


Quick Crochet Hook Holder


Materials
5.5mm Crochet Hook
Worsted Weight Yarn

Stitches Used
ch- chain
dc- double crochet
sc- single crochet
sl st- slip stitch


Note: The starting chain length determines the length of the hook holder. To make a hook holder for more hooks, use a longer starting chain.

Pattern

Ch 28
R1: Dc in 4th ch from hook, dc across (25)
R2: Turn work, ch 3 (count as first dc now and throughout) dc across (25)
R3-5: Repeat Row 2
R6: Turn work, ch1, sc across
Finish off, Weave in ends

Optional Strap
Sl st on the end of the middle row, ch 30, sl st into each ch space
Sl st into base, ch 30, sl st into each ch space
Finish Off

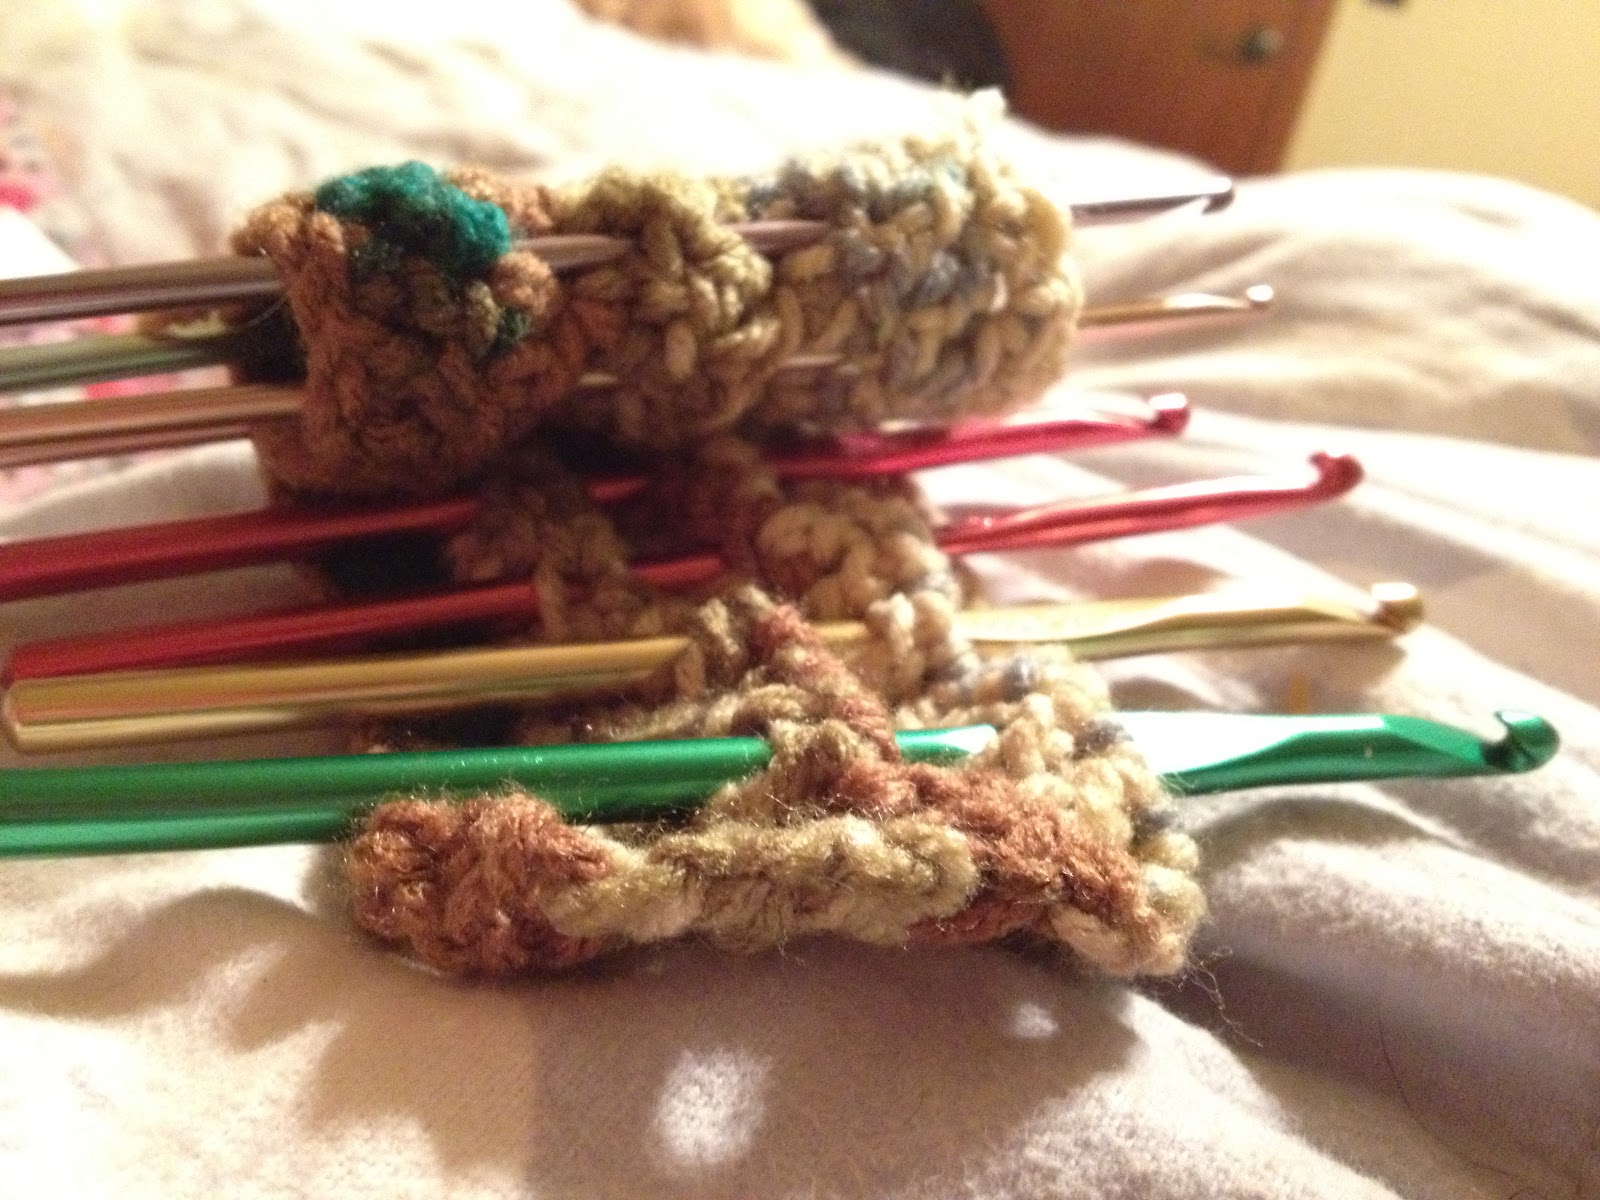
Insert crochet hooks into the holder by weaving them in and out of the rows of double crochet.


Roll up the holder and tie with the straps or a piece of scrap yarn loosely around the holder to keep it from coming unrolled (optional)


You can also single crochet around the outside edge of the holder to give it a more completed look if you would like. :)

Please leave a comment telling me what you think of the pattern! :)

Have a great day!! 

Coming Soon: Quick Crochet Hook Holder

I have another free pattern for you all! It is a crochet hook holder. I had made a little pouch for my crochet hooks, but after reading some information I found out that it is not good for your crochet hooks to hit against each other. That is what mine were doing in the pouch I made so I came up with a solution! 


You simply weave your crochet hooks between the rows!


I did not make mine with a strap but there is an option for a strap in the pattern. It is a very very easy pattern. The pattern is worked in rows. I wanted this pattern to be easily adaptable and very customizable. I will try to put the pattern up today or tomorrow. :)

Have a great day everyone!! 

Monday, July 2, 2012

Multicolored Owl Free Pattern

The Multicolored Owl pattern is now available! Multicolored Owl is also available as a PDF! Here is the download link: Multicolored Owl Download Link

Multicolored Owl


Materials
Three different colors of Worsted weight Yarn
WhiteWorsted Weight Yarn
12mm Safety Eyes
5.5mm Hook
3.75mm Hook
Yarn Needle
Stitch Marker
Stuffing
Felt or small amount of different colored yarn for beak

**Multicolored Owl is worked from the bottomup**

Colors
Colors I Used
Color A
u Color A will be used in both the bottom and top part of the owl.
Tan
Color B
Brown
Color C
Ivory


Body and Head
Using 5.5mm hook and Colors A and B
Placea knot towards the ends of the colors A and B (As seen in photo to the right)

Make a magic ring, 6 sc in ring (6)
R1: 2sc in each st around (12)
R2: 1sc, 2sc in next st(18)

R3: sc 2, 2sc in next st (24)
R4: sc 3, 2sc in next st (30)
R5-8: Sc around (30)
Change to Colors A and C
R9-13: Sc around (30)
R14: sc 7, 2hdc in next st, sc 14, 2hdc in next st, sc 7 (32)
Tie off
Leave a long strand for sewing

Eye Circles (Make 2) Using 3.75mm hook and White yarn (single strand)
Make magic ring, sc 6 in loop 
R1: 2sc in each st around (12) 
R2: 1sc, 2sc in next st (18) 
R3: 1sc in next st, make sl st in next st and use to tie off

Assembly
Attach the safety eyes to the white eye circles you made.
Weave in the ends. Sew eyes onto the owl.
Attach the beak.
Stuff the owl. Fold the opening to where the stitches are aligned across. Sew together.


More photos for reference are available on the PDF version of this pattern

©Carissa Teixeira
Donot sell this pattern
Donot distribute this pattern as your own


Friday, June 29, 2012

Coming Soon: Another Pattern

Hello everyone!!

Yes, it is true. I am working on another amigurumi pattern! I didn't plan on making a pattern when I started making it. One thing led to another though and I decided to make a pattern for it. This is actually not like my other amigurumi patterns though. It is based of an actually animal. "Whooo?" you ask? Well, it asks "Whooo?" too!

I introduce to you Mister Multicolored Owl!

You will be able to make your own Mister or Misses Multicolored Owl very soon!! They are very quick projects. 

I am still in the process of writing the pattern. I am not sure the exact date it will be released, but be sure to keep an eye open for the pattern!

Please let me know what you think of Multicolored Owl in the comments :) 

Tuesday, June 26, 2012

Awesome Amigurumi Friend Free Pattern


Awesome Amigurumi Friend


Materials
4.0mm Hook
Yarn Needle
Worsted Weight Yarn
Stitch Marker
Stuffing
10mm Safety Eyes (optional)
A small amount of a different colored yarn to make the mouth (optional)


Head and Body
Make Magic Ring, Sc 6 (6)
R1: 2 sc in each st around (12)
R2: Sc 1, 2 sc in next st (18)
R3: Sc 2, 2 sc in next st (24)
R4: Sc 3, 2 sc in next st (30)
R5: Sc 4, 2 sc in next st (36)
R69: Sc in each st around (36)
R10: Sc 4, sc2tog (30)
R11: Sc 3, sc2tog (24)
Place Safety Eyes and sew on mouth
R12: Sc 2, sc2tog (18)
Begin stuffing
R13: Sc 1, sc2tog (12)
R1415: Sc in each st around (12)
R16: Sc 1, 2 sc in next st (18)
R17: Sc 2, 2 sc in next st (24)
R1819: Sc in each st around (24)
Continue stuffing firmly
R20: Sc 3, 2 sc in next st (30)
R2134: Sc in each st around (30)
Continue stuffing firmly
R35: Sc 3, sc2tog (24)
R36: Sc 2, sc2tog (18)
R37: Sc 1, sc2tog (12)
R38: sc2tog around (6)
Finish Off

Arms (Make 2)
Magic Ring, Sc 4
R1: 2 sc in each st around (8)
R212: Sc in each st around (8)
Stuff lightly
Finish Off, Leave long tail for sewing

Legs (Make 2)
Magic Ring, Sc 5
R1: 2 sc in each st around (10)
R215: Sc in each st around (10)
Stuff
Finish Off, Leave long tail for sewing

Sew arms and legs onto body

Arm and Leg Suggested Placement
This is where I put the arms and legs. Feel free to attach them where ever you prefer.

I placed the arms on the sides of the body around Row 18.
I placed the legs on the bottom of the body.


© Carissa Teixeira
Do not sell this pattern
Do not distribute this pattern as your own

New Pattern Release

Hello everyone!

I wanted to make a quick blog post to announce that I am realeasing a new pattern. It is going to be a free pattern. It is for an amigurumi. I designed it to celebrate having 50 members in my Ravelry group Awesome Amigurumi. Here is a link to the group if you would like to take a look at it: Link to Awesome Amigurumi group on Ravelry

I would also like to share that I will be updating this blog more often. I will be sharing with you my crochet projects I am working on and updating you on there progress. I will also be sharing some tips that I have learned so that maybe they can help you as well!

Thank you!

Monday, June 18, 2012

Free Purple Monster Pattern


Purple Monster Pattern


Purple Monster Pattern

Materials
Hook: 4mm
Purple Worsted Weight Yarn (or any color for a different colored monster)
A small amount of a different colored yarn for the mouth (optional)
12mm Safety Eyes (optional) (Safety eyes are not safe for small children)
Stitch Marker
Yarn needle

You need to know how to make a magic ring for this pattern.

Body

**Make a magic ring, sc 5 in the ring (5)**
R1: 2sc in each st around (10)
R2: Sc1, 2Sc in next st; Rep 5 times (15)
R3: Sc 2, 2Sc in next st; Rep 5 times (20)
R4: Sc 3, 2Sc in next st; Rep 5 times (25)
R5: Sc 4, 2Sc in next st; Rep 5 times (30)
R6: Sc 5, 2Sc in next st; Rep 5 times (35)
R7: Sc 6, 2Sc in next st; Rep 5 times (40)
R8: Sc 7, 2Sc in next st; Rep 5 times (45)
R9: Sc 8, 2Sc in next st; Rep 5 times (50)
R10-17: Sc in each st around (50)
R18: Sc 8, sc2tog; Rep 5 times (45)
R19: Sc in each st around (45)
R20: Sc 7, sc2tog; Rep 5 times (40)
R21: Sc 6, sc2tog; Rep 5 times (35)
R22-24: Sc in each st around (35)
R25: Sc 6, 2Sc in next st; Rep 5 times (40)
R26: Sc 7, 2Sc in next st; Rep 5 times (45)
R27-29: Sc in each st around (45)
R30:Sc 7, sc2tog; Rep 5 times (40)
R31:Sc 6, sc2tog; Rep 5 times (35)
R32:Sc 5, sc2tog; Rep 5 times (30)
Begin stuffing firmly
R33:Sc 4, sc2tog; Rep 5 times (25)
R34:Sc 3, sc2tog; Rep 5 times (20)
R35:Sc 2, sc2tog; Rep 5 times (15)
Continue stuffing firmly
Tie off, leave long end for sewing


Head

**Make a magic ring, sc 5 in the ring (5)**
R1: 2sc in each st around (10)
R2: Sc1, 2Sc in next st; Rep 5 times (15)
R3: Sc 2, 2Sc in next st; Rep 5 times (20)
R4: Sc 3, 2Sc in next st; Rep 5 times (25)
R5: Sc 4, 2Sc in next st; Rep 5 times (30)
R6: Sc 5, 2Sc in next st; Rep 5 times (35)
R7: Sc 6, 2Sc in next st; Rep 5 times (40)
R8: Sc 7, 2Sc in next st; Rep 5 times (45)
R9: Sc 8, 2Sc in next st; Rep 5 times (50)
R10-13: Sc in each st around (50)
R14: Sc 8, sc2tog; Rep 5 times (45)
R15:Sc 7, sc2tog; Rep 5 times (40)
R16:Sc 6, sc2tog; Rep 5 times (35)
R17:Sc 5, sc2tog; Rep 5 times (30)
Place Safety eyes and begin stuffing firmly
R18:Sc 4, sc2tog; Rep 5 times (25)
R19:Sc 3, sc2tog; Rep 5 times (20)
R20:Sc 2, sc2tog; Rep 5 times (15)
Continue stuffing firmly
Tie off


Arms (Make 2 or more)

**Make a magic ring, sc 5 in the ring (5)**
R1: 2sc in each st around (10)
R2-23: Sc in each st around (10)
Stuff lightly
Tie off, leave long end for sewing

Sew the head and body together. Sew the arms on the body.
Sew a mouth (optional)

© Carissa Teixeira
Do not sell this pattern
Do not distribute this pattern as your own


Tuesday, May 29, 2012

Back again!

I am so sorry everyone! I have been really busy focusing on all my projects!! I have just designed an amigurumi. It is pretty simple in my opinion. I have written the pattern and typed it up. However, I can not release the pattern until I have it tested. If you are interested in testing please leave a comment. Here is a picture of my Purple Monster amigurumi

Thursday, May 3, 2012

Free Wallet/Card Holder Pattern

4.50mm Hook

Ch. 18
R1: sc17 - sc in 2nd loop from the hook
R2: *sc 17 under BOTH loops, ch1, turn
R3 - R29: Repeat from *
R30: sc2tog, sc 13, sc2tog (15), ch1, turn
R31: sc2tog, sc 11, sc2tog (13), ch1, turn
R32: even (13), ch1, turn
R33: even (13), ch1, turn
R34: sc2tog, sc 9, sc2tog (11), ch1, turn
R35: 2 sc2tog, sc 3, 2 sc2tog (7), ch1, turn
R36: 2 sc2tog, sc 1, 2 sc2tog (4), ch1, turn
R37: even (4), tie off, weave in ends

Fold Row 1 up to Row 27, sew sides together and stitch around top flap OR single crocheted sides together, and then continue up around the flap


sc2tog = sc decrease (single crochet two stitches together)
sc = single crochet


Tuesday, May 1, 2012

Not Again!!

It seems like as soon as I start feeling better I get sick again! Bleh!! I don't know when my pattern will be up yet. I am hoping by this weekend, but I am not 100% sure yet. Hopefully I feel good this weekend too!! I am somewhat in between crocheting projects as well.

Sunday, April 29, 2012

Working on a Pattern!!

Sorry I haven't posted anything lately. I have been busy working on developing a pattern! :D I am really excited to share it with all of you! I am not done with it yet. I just wrote the pattern rough draft and still have to test it and fix any mistakes it may have.
The pattern makes a wallet/car holder. I will post a picture when post the pattern! I can't wait! Hope you guys will like it!! :)

Tuesday, April 24, 2012

What are we going to do today Brain?

Unlike most teenagers I really don't like missing school. Why? Mainly due to all the make up work I will have when I get back. Unfortunately I am sick again today with a fever and sore throat.
Having said all that, I think I am going to work on my elephant. I'm not really sure how to link, but if I do I will put a link to the pattern I am using. I am crocheting it (this being a crochet blog and all). I started using a 5mm hook then switch to a 4.5mm. I know you shouldn't switch hooks mid project but I was/am being lazy.


Here is the website address for the pattern I am using: http://www.lionbrand.com/patterns/70582AD.html?iP=1&p=2&ss=http%3A%2F%2Fwww.ravelry.com%2Fpatterns%2Flibrary%2Famigurumi-elephant-2