Translate this blog

Showing posts with label free. Show all posts

Monday, July 23, 2012

Quick Crochet Hook Holder Free Pattern


Quick Crochet Hook Holder


Materials
5.5mm Crochet Hook
Worsted Weight Yarn

Stitches Used
ch- chain
dc- double crochet
sc- single crochet
sl st- slip stitch


Note: The starting chain length determines the length of the hook holder. To make a hook holder for more hooks, use a longer starting chain.

Pattern

Ch 28
R1: Dc in 4th ch from hook, dc across (25)
R2: Turn work, ch 3 (count as first dc now and throughout) dc across (25)
R3-5: Repeat Row 2
R6: Turn work, ch1, sc across
Finish off, Weave in ends

Optional Strap
Sl st on the end of the middle row, ch 30, sl st into each ch space
Sl st into base, ch 30, sl st into each ch space
Finish Off

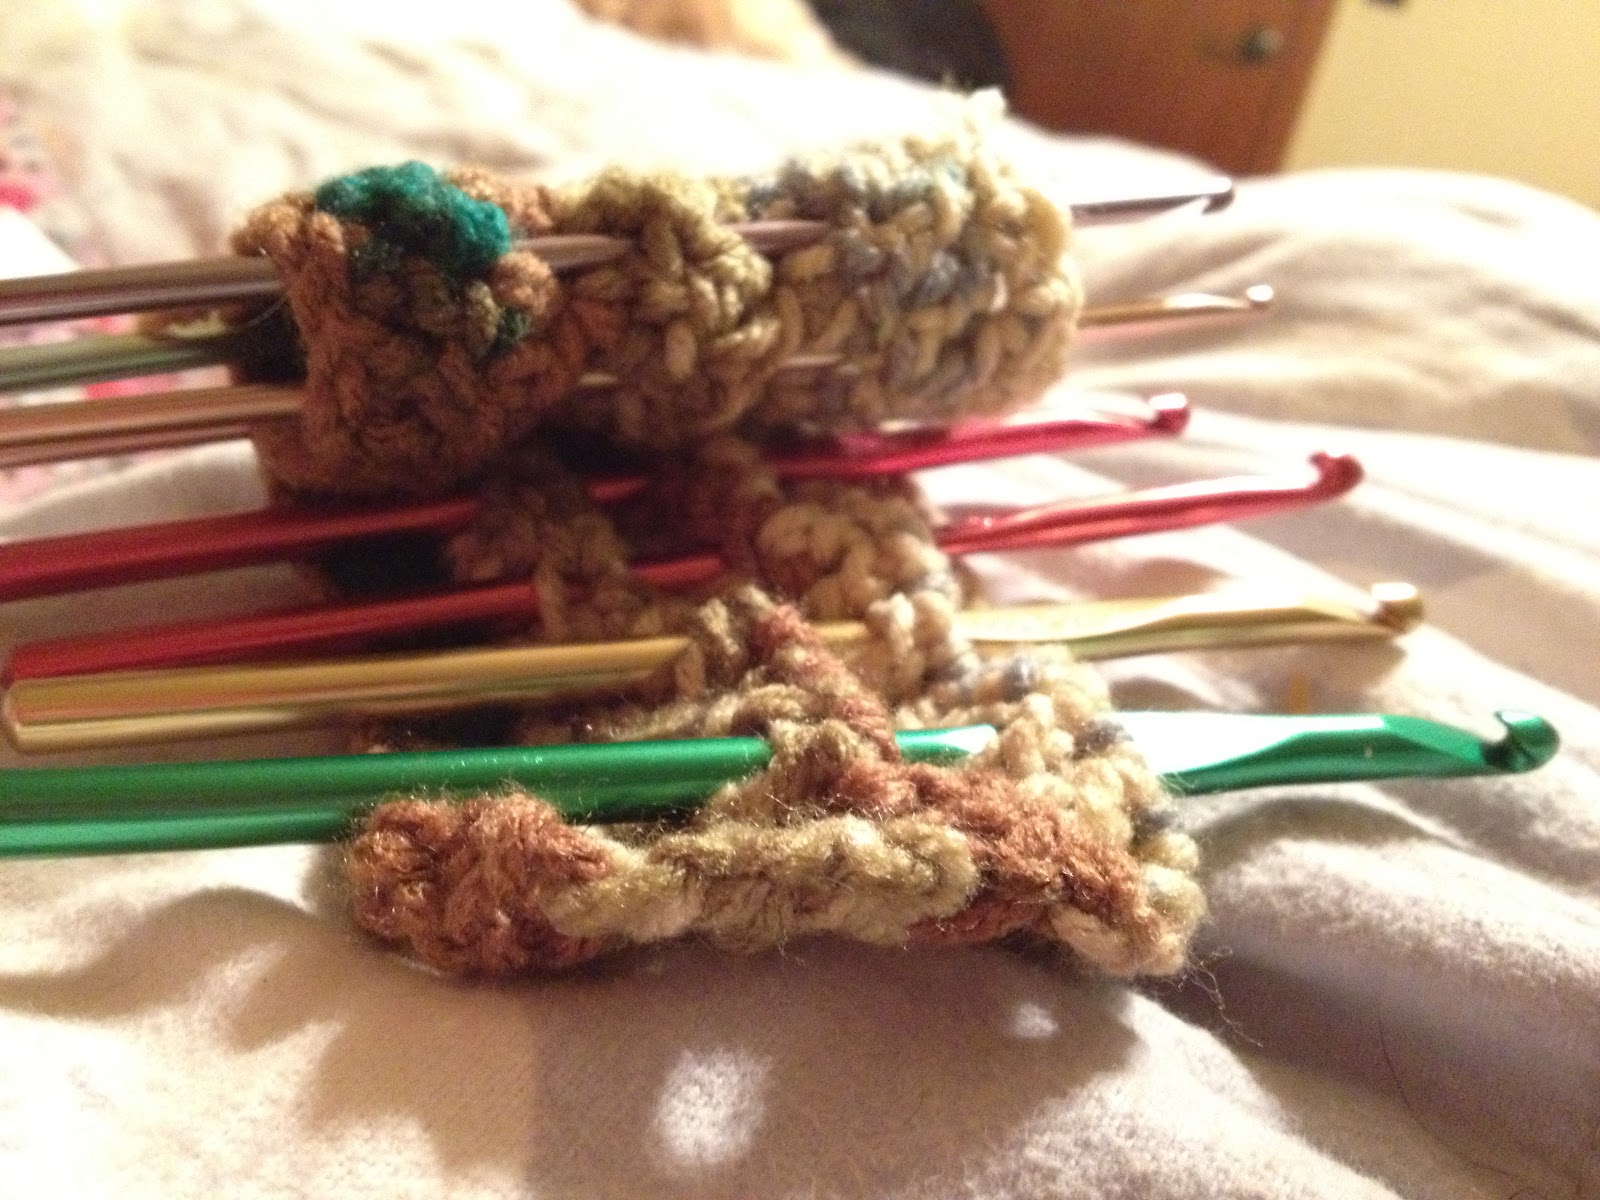
Insert crochet hooks into the holder by weaving them in and out of the rows of double crochet.


Roll up the holder and tie with the straps or a piece of scrap yarn loosely around the holder to keep it from coming unrolled (optional)


You can also single crochet around the outside edge of the holder to give it a more completed look if you would like. :)

Please leave a comment telling me what you think of the pattern! :)

Have a great day!! 

Coming Soon: Quick Crochet Hook Holder

I have another free pattern for you all! It is a crochet hook holder. I had made a little pouch for my crochet hooks, but after reading some information I found out that it is not good for your crochet hooks to hit against each other. That is what mine were doing in the pouch I made so I came up with a solution! 


You simply weave your crochet hooks between the rows!


I did not make mine with a strap but there is an option for a strap in the pattern. It is a very very easy pattern. The pattern is worked in rows. I wanted this pattern to be easily adaptable and very customizable. I will try to put the pattern up today or tomorrow. :)

Have a great day everyone!! 

Tuesday, June 26, 2012

Awesome Amigurumi Friend Free Pattern


Awesome Amigurumi Friend


Materials
4.0mm Hook
Yarn Needle
Worsted Weight Yarn
Stitch Marker
Stuffing
10mm Safety Eyes (optional)
A small amount of a different colored yarn to make the mouth (optional)


Head and Body
Make Magic Ring, Sc 6 (6)
R1: 2 sc in each st around (12)
R2: Sc 1, 2 sc in next st (18)
R3: Sc 2, 2 sc in next st (24)
R4: Sc 3, 2 sc in next st (30)
R5: Sc 4, 2 sc in next st (36)
R69: Sc in each st around (36)
R10: Sc 4, sc2tog (30)
R11: Sc 3, sc2tog (24)
Place Safety Eyes and sew on mouth
R12: Sc 2, sc2tog (18)
Begin stuffing
R13: Sc 1, sc2tog (12)
R1415: Sc in each st around (12)
R16: Sc 1, 2 sc in next st (18)
R17: Sc 2, 2 sc in next st (24)
R1819: Sc in each st around (24)
Continue stuffing firmly
R20: Sc 3, 2 sc in next st (30)
R2134: Sc in each st around (30)
Continue stuffing firmly
R35: Sc 3, sc2tog (24)
R36: Sc 2, sc2tog (18)
R37: Sc 1, sc2tog (12)
R38: sc2tog around (6)
Finish Off

Arms (Make 2)
Magic Ring, Sc 4
R1: 2 sc in each st around (8)
R212: Sc in each st around (8)
Stuff lightly
Finish Off, Leave long tail for sewing

Legs (Make 2)
Magic Ring, Sc 5
R1: 2 sc in each st around (10)
R215: Sc in each st around (10)
Stuff
Finish Off, Leave long tail for sewing

Sew arms and legs onto body

Arm and Leg Suggested Placement
This is where I put the arms and legs. Feel free to attach them where ever you prefer.

I placed the arms on the sides of the body around Row 18.
I placed the legs on the bottom of the body.


© Carissa Teixeira
Do not sell this pattern
Do not distribute this pattern as your own

Monday, June 18, 2012

Free Purple Monster Pattern


Purple Monster Pattern


Purple Monster Pattern

Materials
Hook: 4mm
Purple Worsted Weight Yarn (or any color for a different colored monster)
A small amount of a different colored yarn for the mouth (optional)
12mm Safety Eyes (optional) (Safety eyes are not safe for small children)
Stitch Marker
Yarn needle

You need to know how to make a magic ring for this pattern.

Body

**Make a magic ring, sc 5 in the ring (5)**
R1: 2sc in each st around (10)
R2: Sc1, 2Sc in next st; Rep 5 times (15)
R3: Sc 2, 2Sc in next st; Rep 5 times (20)
R4: Sc 3, 2Sc in next st; Rep 5 times (25)
R5: Sc 4, 2Sc in next st; Rep 5 times (30)
R6: Sc 5, 2Sc in next st; Rep 5 times (35)
R7: Sc 6, 2Sc in next st; Rep 5 times (40)
R8: Sc 7, 2Sc in next st; Rep 5 times (45)
R9: Sc 8, 2Sc in next st; Rep 5 times (50)
R10-17: Sc in each st around (50)
R18: Sc 8, sc2tog; Rep 5 times (45)
R19: Sc in each st around (45)
R20: Sc 7, sc2tog; Rep 5 times (40)
R21: Sc 6, sc2tog; Rep 5 times (35)
R22-24: Sc in each st around (35)
R25: Sc 6, 2Sc in next st; Rep 5 times (40)
R26: Sc 7, 2Sc in next st; Rep 5 times (45)
R27-29: Sc in each st around (45)
R30:Sc 7, sc2tog; Rep 5 times (40)
R31:Sc 6, sc2tog; Rep 5 times (35)
R32:Sc 5, sc2tog; Rep 5 times (30)
Begin stuffing firmly
R33:Sc 4, sc2tog; Rep 5 times (25)
R34:Sc 3, sc2tog; Rep 5 times (20)
R35:Sc 2, sc2tog; Rep 5 times (15)
Continue stuffing firmly
Tie off, leave long end for sewing


Head

**Make a magic ring, sc 5 in the ring (5)**
R1: 2sc in each st around (10)
R2: Sc1, 2Sc in next st; Rep 5 times (15)
R3: Sc 2, 2Sc in next st; Rep 5 times (20)
R4: Sc 3, 2Sc in next st; Rep 5 times (25)
R5: Sc 4, 2Sc in next st; Rep 5 times (30)
R6: Sc 5, 2Sc in next st; Rep 5 times (35)
R7: Sc 6, 2Sc in next st; Rep 5 times (40)
R8: Sc 7, 2Sc in next st; Rep 5 times (45)
R9: Sc 8, 2Sc in next st; Rep 5 times (50)
R10-13: Sc in each st around (50)
R14: Sc 8, sc2tog; Rep 5 times (45)
R15:Sc 7, sc2tog; Rep 5 times (40)
R16:Sc 6, sc2tog; Rep 5 times (35)
R17:Sc 5, sc2tog; Rep 5 times (30)
Place Safety eyes and begin stuffing firmly
R18:Sc 4, sc2tog; Rep 5 times (25)
R19:Sc 3, sc2tog; Rep 5 times (20)
R20:Sc 2, sc2tog; Rep 5 times (15)
Continue stuffing firmly
Tie off


Arms (Make 2 or more)

**Make a magic ring, sc 5 in the ring (5)**
R1: 2sc in each st around (10)
R2-23: Sc in each st around (10)
Stuff lightly
Tie off, leave long end for sewing

Sew the head and body together. Sew the arms on the body.
Sew a mouth (optional)

© Carissa Teixeira
Do not sell this pattern
Do not distribute this pattern as your own


Thursday, May 3, 2012

Free Wallet/Card Holder Pattern

4.50mm Hook

Ch. 18
R1: sc17 - sc in 2nd loop from the hook
R2: *sc 17 under BOTH loops, ch1, turn
R3 - R29: Repeat from *
R30: sc2tog, sc 13, sc2tog (15), ch1, turn
R31: sc2tog, sc 11, sc2tog (13), ch1, turn
R32: even (13), ch1, turn
R33: even (13), ch1, turn
R34: sc2tog, sc 9, sc2tog (11), ch1, turn
R35: 2 sc2tog, sc 3, 2 sc2tog (7), ch1, turn
R36: 2 sc2tog, sc 1, 2 sc2tog (4), ch1, turn
R37: even (4), tie off, weave in ends

Fold Row 1 up to Row 27, sew sides together and stitch around top flap OR single crocheted sides together, and then continue up around the flap


sc2tog = sc decrease (single crochet two stitches together)
sc = single crochet


Sunday, April 29, 2012

Working on a Pattern!!

Sorry I haven't posted anything lately. I have been busy working on developing a pattern! :D I am really excited to share it with all of you! I am not done with it yet. I just wrote the pattern rough draft and still have to test it and fix any mistakes it may have.
The pattern makes a wallet/car holder. I will post a picture when post the pattern! I can't wait! Hope you guys will like it!! :)